This post and its photos may contain affiliate links. As an Amazon associate I earn from qualifying purchases. If you make a purchase through these links, I may receive a small commission at no extra cost to you.
Learn how to create SVG cut files using Inkscape with our easy tutorial. These simple steps will help you create your very own SVG files for personal and commercial use.
Are you wondering how to make your own cut files? If so, you’ve come to the right place because I’m sharing step-by-step directions that will teach you how to create SVG cut files using Inkscape.
This simple tutorial will guide you through all the steps you’ll need to make your own SVG files for Cricut and Silhouette projects. You can even use this tutorial for Glowforge projects. These 10 steps will walk you through everything I do when creating SVG cut files from start to finish.
I first started creating SVG files when I got my Cricut a few years ago. Cricut Design Space has a ton of awesome designs but I wanted to have my own designs to share with my readers who might not subscribe to Design Space. And, since I have small font addiction, creating SVG cut files with Inkscape was surprisingly easy. The hardest part is deciding which fonts I want to use when creating designs.
What is an SVG File?
SVG stands for Scalable Vector Graphic. Unlike other popular image files like PNG and JPG, SVG format is a type of graphic made of points, lines, curves, and shapes. SVGs are scalable meaning the resolution won’t change when the size is increased or decrease. SVG files are the preferred file to use with vinyl cutting machines because they can be resized and scaled without affecting the quality of the image. A JPG or PNG will often present blurry or jagged lines when trying to increase the file but an SVG will still display clean, crisp lines when changing it’s size.
What Can You Use SVG Cut Files for?
SVGs are mostly used by designers in websites to display logos, buttons, charts and other graphics. We are creating SVG files to use with our Cricut. They can also be used with a Silhouette or other cutting machines. They can also be used with laser printers like the Glowforge. SVG cut files are recommended when cutting designs because they have clean lines and can be scaled to different sizes.
What Software is Needed to Make SVG Cut Files?
There are many different ways to create your own SVG cut files. Today we’re going to be using Inkscape because it’s free and free is always awesome! I’ve been using inkscape to create svg files for a few years now I can honestly say it’s an easy program to use especially when you’re making simple designs.
I will admit that I still have a lot to learn when it comes to using Inkscape but creating SVGs in Inkscape is easy – remember, my goal here on KC is to share simple projects because if I can do it, you can do it too.
What Fonts Can I Use to Create SVG Files?
If you’re creating SVG files for personal use, you can use fonts fonts from sites like free fonts and dafont.com. Just remember, these are for personal use only and can not be used in designs or items that you are selling.
If want to create SVG files to sell in your online shop, on Facebook Marketplace or to friends and family, you will need to use fonts that come with a commercial license. I usually purchase my fonts from Creative Market, Font Bundles, and Creative Fabrica.
If you need help download fonts to your computer, this tutorial will help.
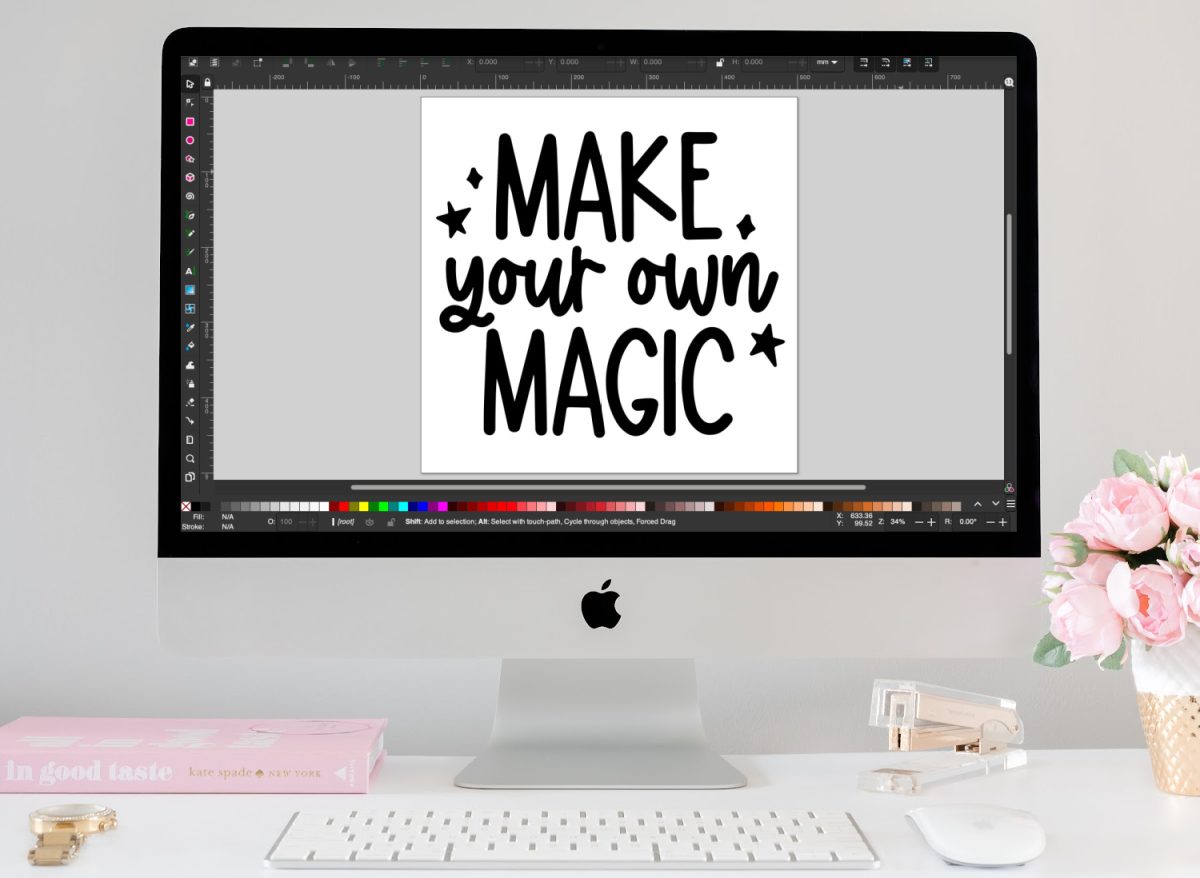
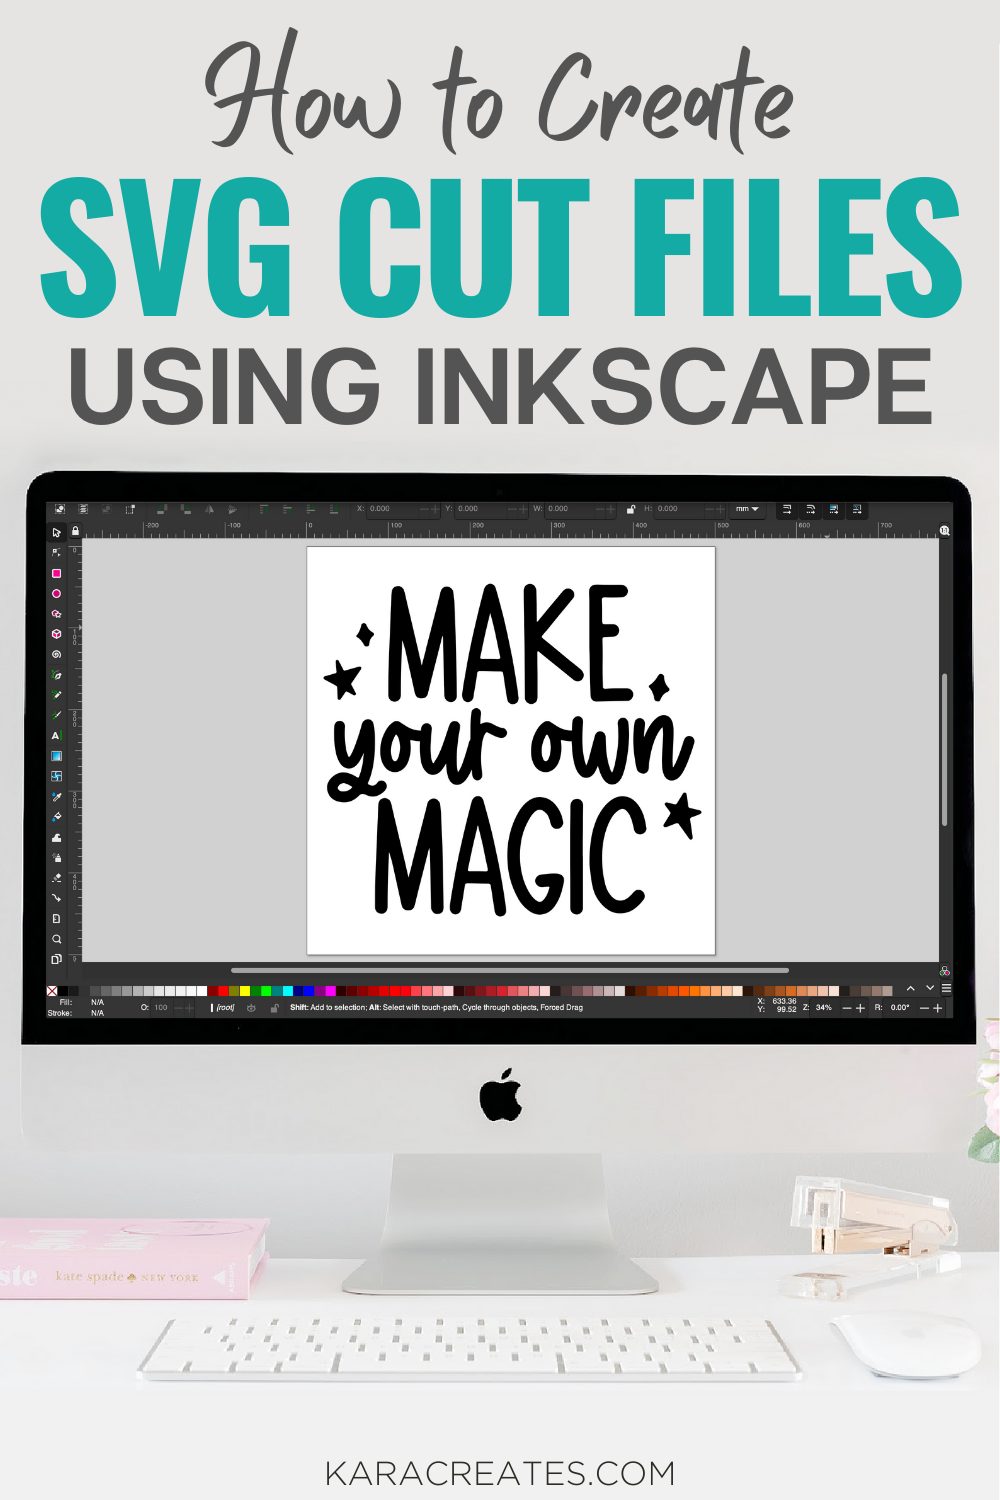
I used the following fonts to create this Make Your Own Magic SVG:
- Text – Sugar Moon Font Duo
- Doodles – Magic Charm (used the Star Dust doodles)
How to Create SVG Cut Files Using Inkscape
Now we’re finally ready to create our SVG. I’m going to walk you through the steps I take when creating my SVG cut files.
Step 1: Download Inkscape.
Remember, Inkscape is free so you don’t need to buy any software.
Step 2: Open Inkscape
Once you’ve installed Inkscape, open Inkscape and you should have a new template on your screen.
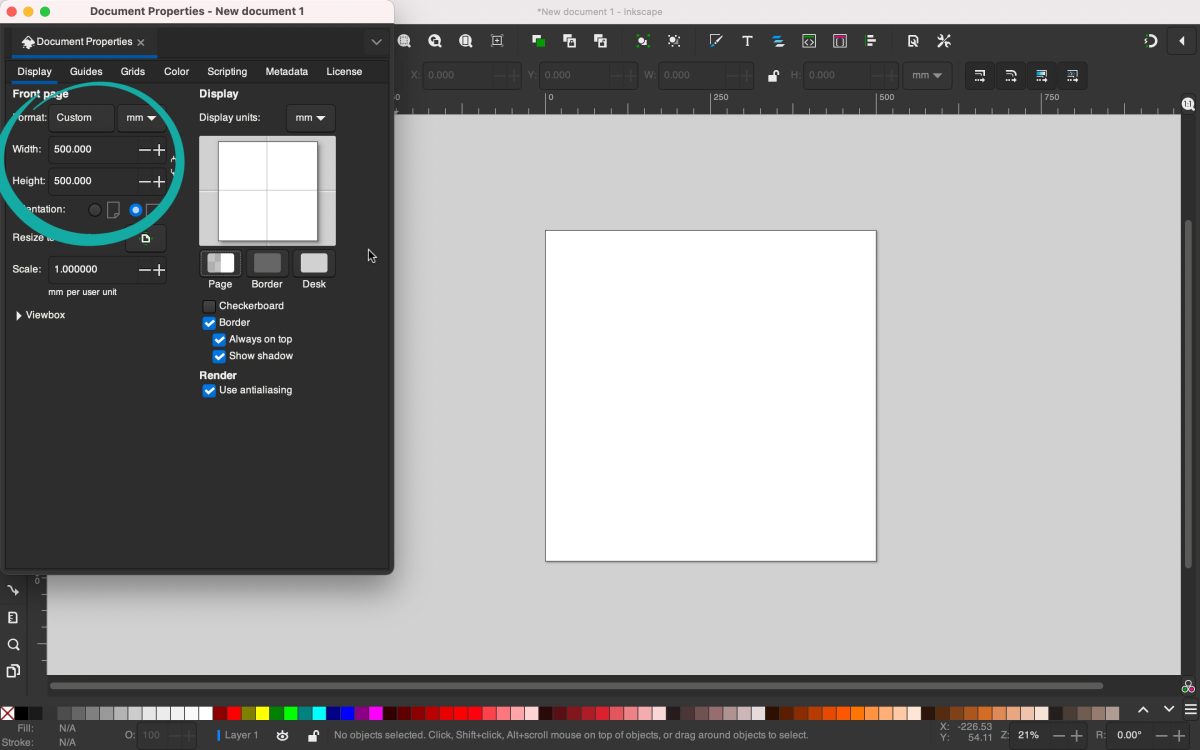
Step 3: New Template
I like to work with a square template when designing SVGs. To resize the template, select File and click Document Properties. I always set my width and height to 500 x 500 mm but this can be customized to whatever dimensions you want.
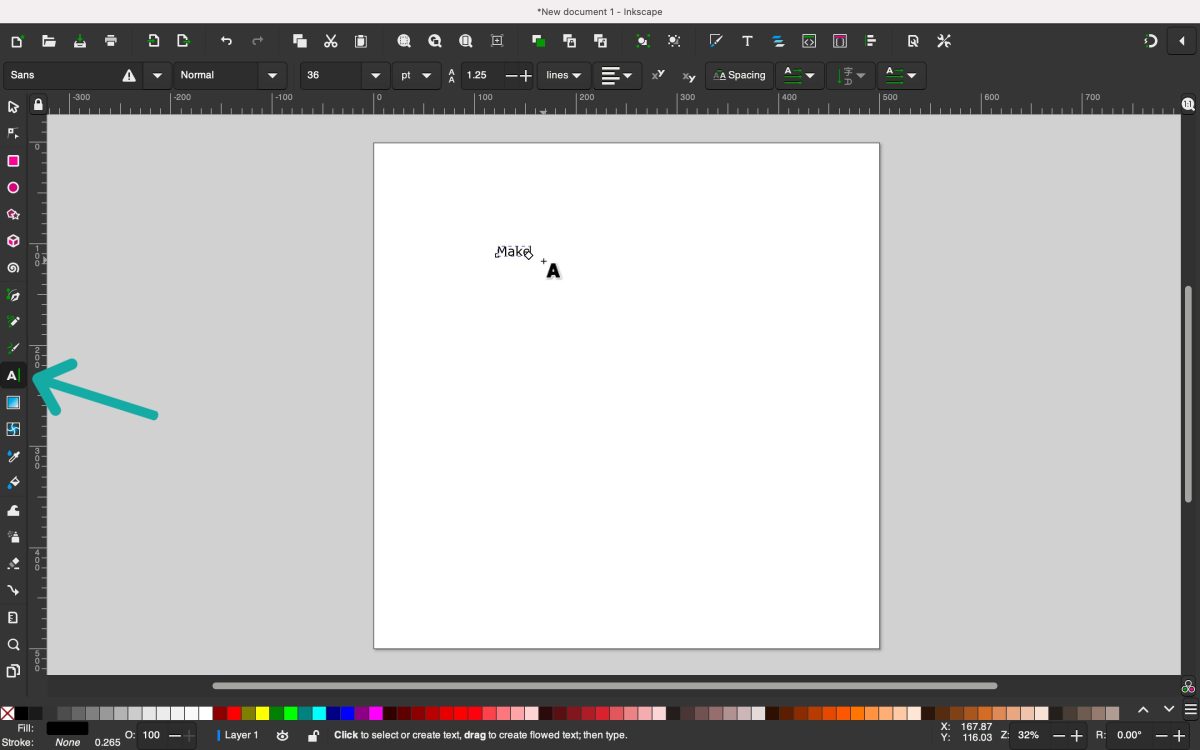
Step 4: Add Text
Now we’re ready to add our text. Select the text tool from the vertical toolbar on the right (the letter A). You can also select F8 if using a PC and T if using a Mac.
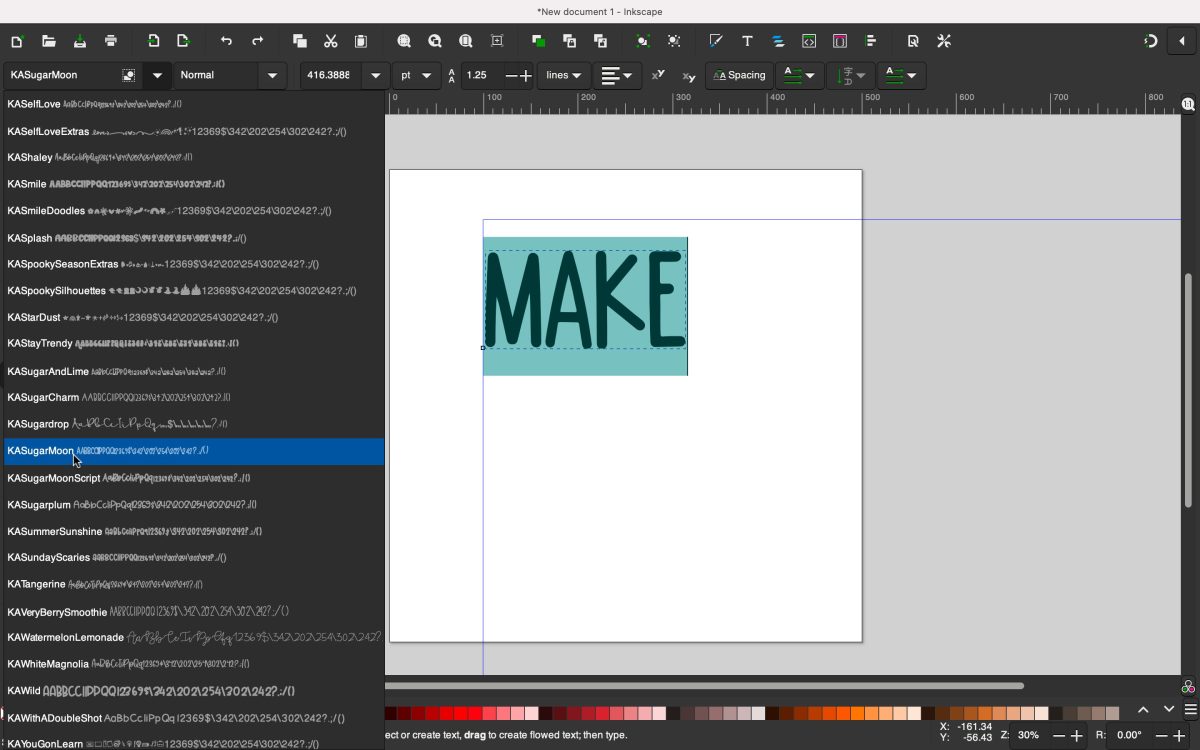
Type your text and select the font you want to use. To select the font, click the small triangle next to the font drop down box. You can also click Text from the menu bar and select Text and Font to change the font, style and size. I used Sugar Moon Font Duo for Make Your Own Magic and the Magic Charm for the stars.
Step 5: Resize Text/Images
Click on the select tool (arrow) on the vertical toolbar. Before resizing the text and/or images, I highly recommend locking the text. To do this, click the lock located on the Tool Controls Bar.
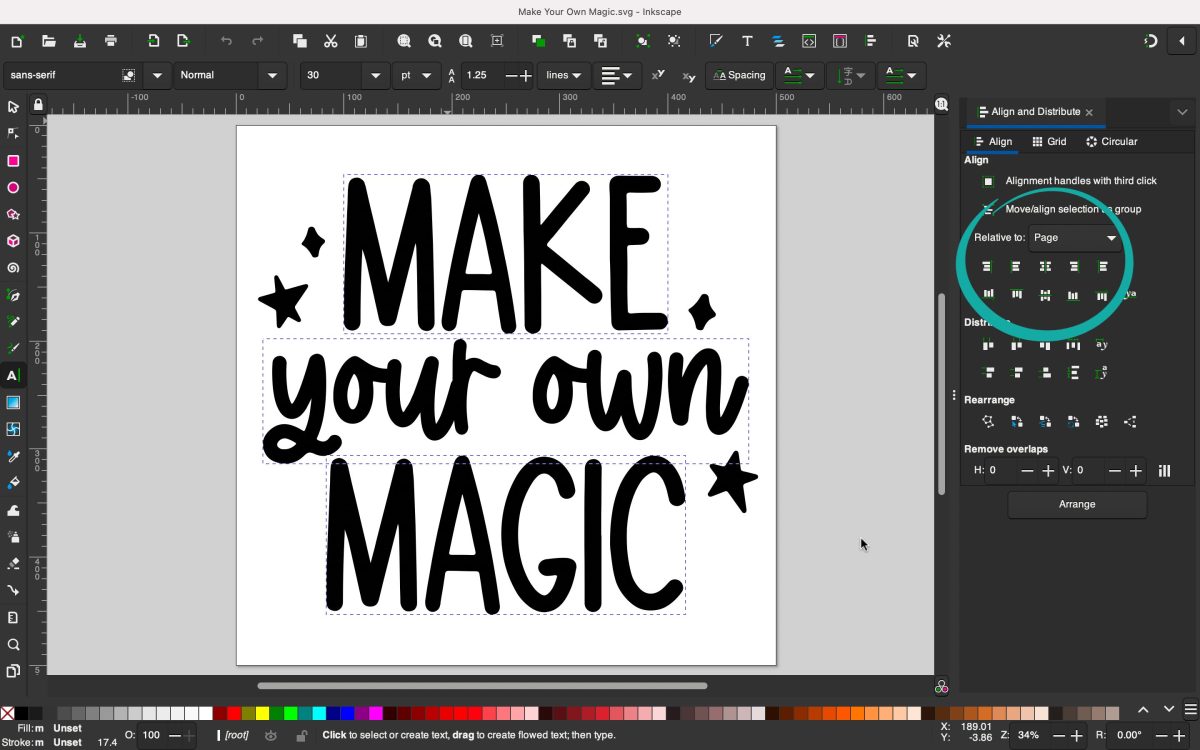
Step 6: Align and Distribute
Select the elements that you would like to center. To do this, make sure you are using the selector tool. Click Object in the menu bar and select Align and Distribute. Make sure you have Page selected next to Relative to. Select Center on Vertical Axis to make sure everything is center on the template. If you want everything aligned to the left or right, select Align Left or Align Right. If you want to make sure the entire design is centered in the center of the template, click Edit on menu bar and Select All, then Object on menu bar and Group. Now select Center on Vertical Axis and Center on Horizontal Axis.
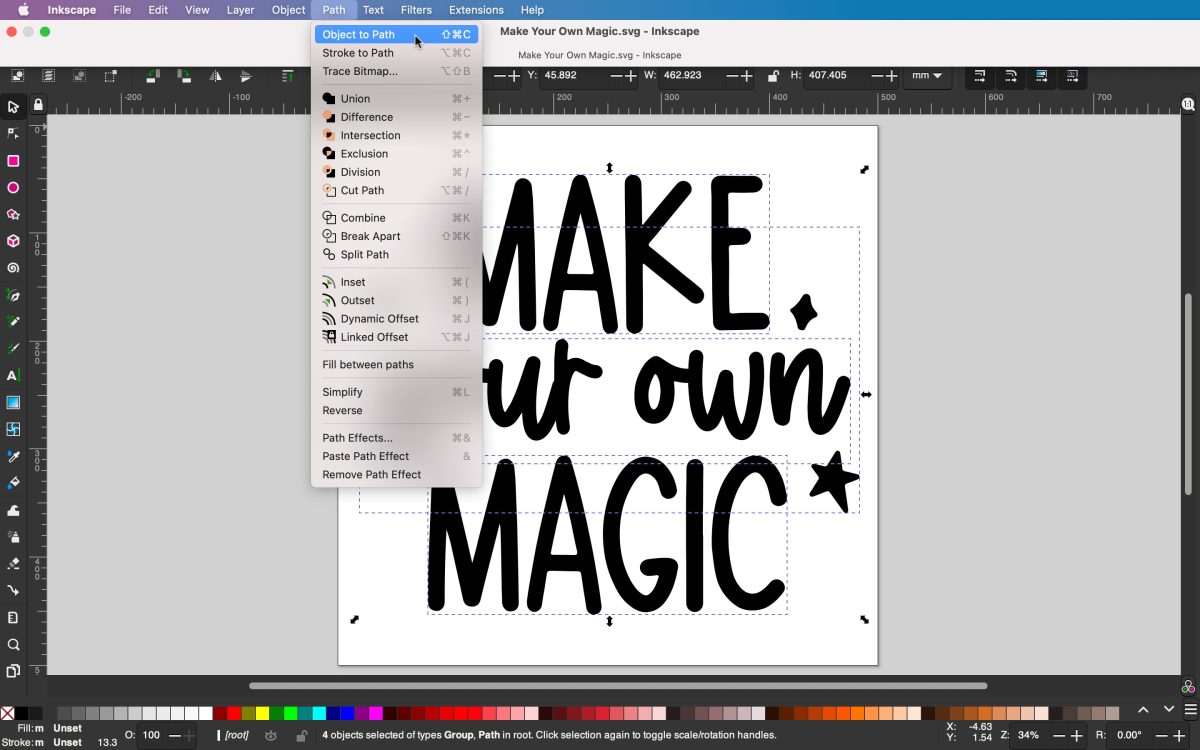
Step 7: Object to Path
Once you’ve finished creating your design, we need to turn our design into an SVG. This will allow us to do a few things. First, we can resize the image without changing the quality of the image. We can also upload it to use in Cricut Design Space. To do this, click Edit on the men bar and click Select All. Now select Path on the menu bar and click Object to Path. To make sure your design is an SVG, you will want to make sure the design has nodes. Nodes allow you to move and edit the different paths within the design.
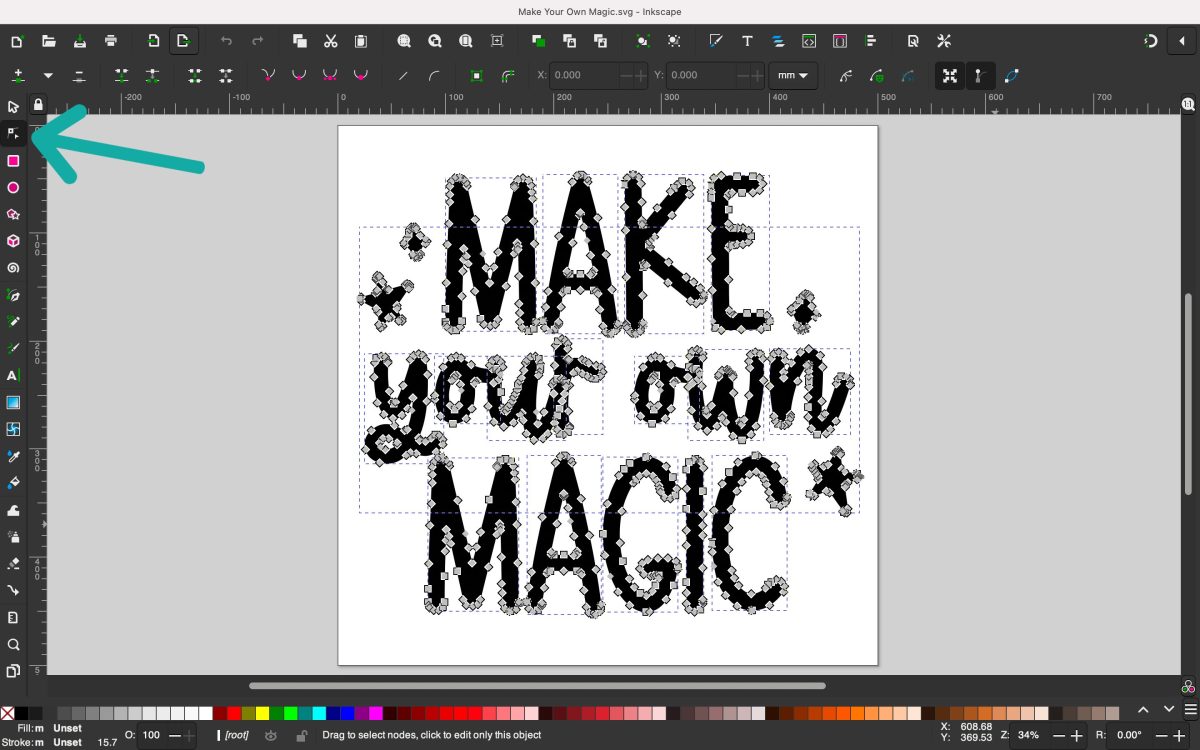
Step 8: Check Your Nodes
To make sure your design has been changed to a path, click on the Node Tool on the vertical toolbar. Then click on your design. You should now see all the nodes in your design. If you don’t see the nodes, you will need to repeat step 6.
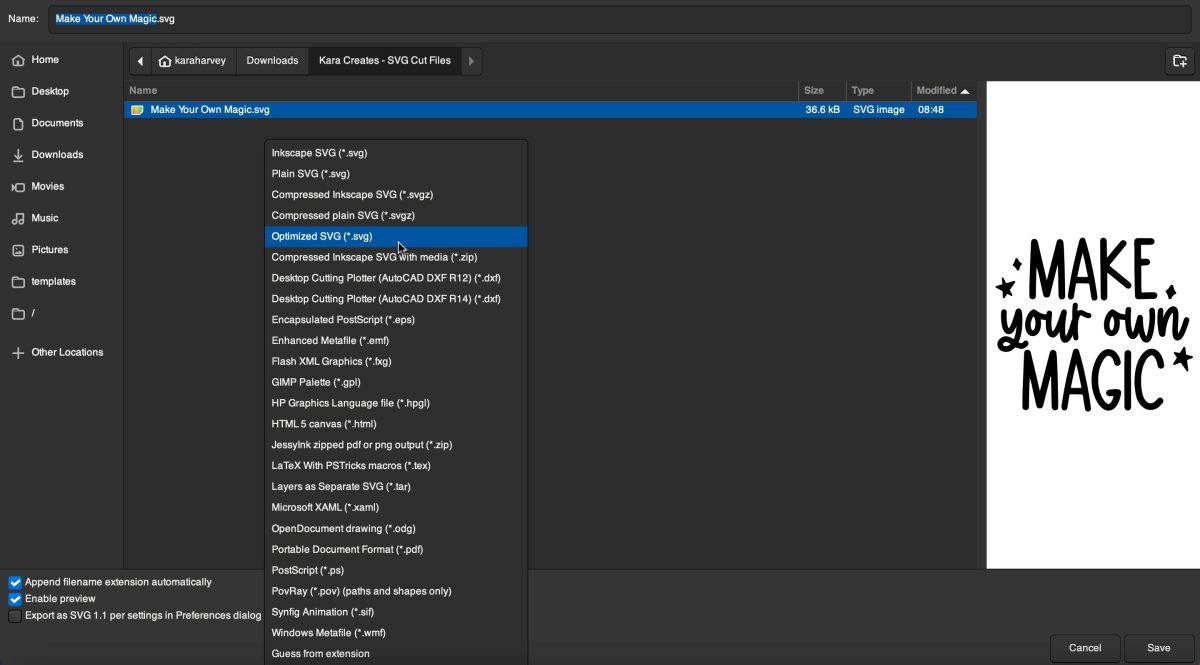
Step 9: Save Your Design
Once you have finished creating your design, it’s time to save it. Select File and Save As. Type in the name of your file and select your file type at the bottom of the screen. Here you’ll want to save your design as an Optimized SVG. Select Optimized SVG and click Save.
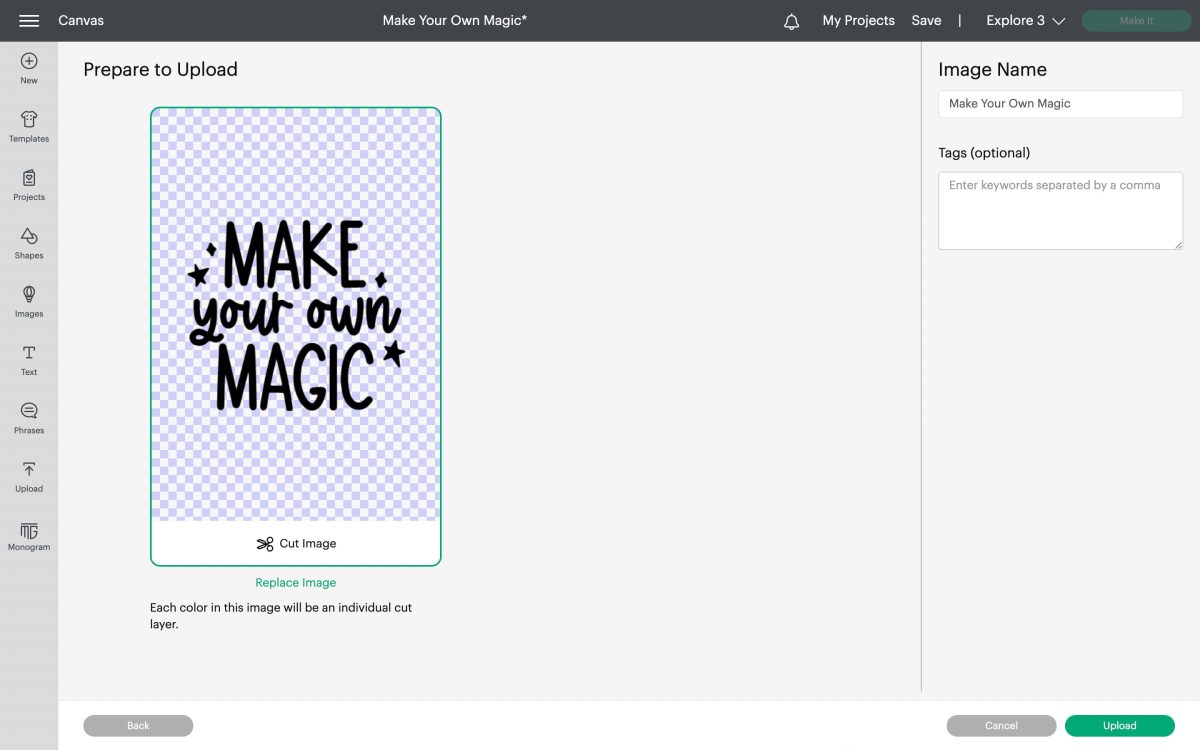
Step 10: Upload Design to Cricut Design Space
I like to upload every design I create to Cricut Design Space to make sure it looks the way I want it to look and to make sure it uploads correctly. I don’t always cut every design I create and add to my shop but I always check them in Design Space before listing them and sharing my freebies. Trust me, I make mistakes too and this is a very important step. And, obviously, we’re creating designs to use with a cutting machine so we need to make sure they can be uploaded and cut correctly.
Helpful Inkscape Tips
- To open a new template, click File and New.
- To create a custom template, click File, New, and Document Properties. Select the size of the template and click File and Save Template. Name your template and click save. Now you can open your template under File and New From Template.
- Don’t forget to lock text and images before resizing. Click the lock located on the Tool Controls Bar.
- If you find that something in your design isn’t lining up when uploading to Cricut Design Space, there are a few things you can do. First, click Select All, Path and Combine. Next, click Object and Group. This should correct everything in Design Space.
Commercial Use SVG Files
Please remember that if you want to create SVGs to sell in an online shop like Etsy or a Shopify store, you need to use a font that comes with a commercial use license. Most free fonts are for personal use only so we recommend purchasing a font from Creative Market, Font Bundles, and Creative Fabrica. These fonts all come with a commercial use license and allow you to create designs using the purchased font.
Do you have any questions after following this tutorial to create SVG cut files using Inkscape? Please comment below or email me. I’m happy to help!
Need help uploading SVGs to Cricut Design Space? Don’t worry! This tutorial will help.

How to Create SVG Cut Files Using Inkscape
Materials
- Computer
- Inkscape
- Cricut Design Space
Instructions
- Download Inkscape.
- Once you’ve installed Inkscape, open Inkscape and you should have a new template on your screen.
- I like to work with a square template when designing SVGs. To resize the template, select File and click Document Properties. I always set my width and height to 500 x 500 mm but this can be customized to whatever dimensions you want.
- Now we’re ready to add our text. Select the text tool from the vertical toolbar on the right (the letter A). You can also select F8 if using a PC and T if using a Mac.
- Type your text and select the font you want to use. To select the font, click the small triangle next to the font drop down box. You can also click Text from the menu bar and select Text and Font to change the font, style and size.
- To resize the text and images, click on the select tool (arrow) on the vertical toolbar. Before resizing the text and/or images, I highly recommend locking the text. To do this, click the lock located on the Tool Controls Bar.
- Align and Distribute the design to make sure everything is centered. Select the elements that you would like to center. To do this, make sure you are using the selector tool. Click Object in the menu bar and select Align and Distribute. Make sure you have Page selected next to Relative to. Select Center on Vertical Axis to make sure everything is center on the template. If you want everything aligned to the left or right, select Align Left or Align Right. If you want to make sure the entire design is centered in the center of the template, click Edit on menu bar and Select All, then Object on menu bar and Group. Now select Center on Vertical Axis and Center on Horizontal Axis.
- Once you’ve finished creating your design, we need to turn our design into an SVG. This will allow us to do a few things. First, we can resize the image without changing the quality of the image. We can also upload it to use in Cricut Design Space. To do this, click Edit on the men bar and click Select All. Now select Path on the menu bar and click Object to Path. To make sure your design is an SVG, you will want to make sure the design has nodes. Nodes allow you to move and edit the different paths within the design.
- To make sure your design has been changed to a path, click on the Node Tool on the vertical toolbar. Then click on your design. You should now see all the nodes in your design. If you don’t see the nodes, you will need to repeat step 6.
- Once you have finished creating your design, it's time to save it. Select File and Save As. Type in the name of your file and select your file type at the bottom of the screen. Here you'll want to save your design as an Optimized SVG. Select Optimized SVG and click Save.
- Upload Design to Cricut Design Space to make sure it uploads correctly.
Notes
- To open a new template, click File and New.
- To create a custom template, click File, New, and Document Properties. Select the size of the template and click File and Save Template. Name your template and click save. Now you can open your template under File and New From Template.
- Don’t forget to lock text and images before resizing. Click the lock located on the Tool Controls Bar.
- If you find that something in your design isn’t lining up when uploading to Cricut Design Space, there are a few things you can do. First, click Select All, Path and Combine. Next, click Object and Group. This should correct everything in Design Space.
Thank you for sharing this tutorial it was so helpful.