This post and its photos may contain affiliate links. As an Amazon associate I earn from qualifying purchases. If you make a purchase through these links, I may receive a small commission at no extra cost to you.
I’m so excited to share my latest project with you all!!
My friend Stephanie and I just finished making tie dyed Valentine shirts for our favorite little valentines and we couldn’t be happier with them.
I have to admit that I’ve never made tie dye clothing before and I had no idea how much fun it is!


Want to make your own heart tie dye shirt?
All you need is a white shirt, two colors of tie dye (red and another color), rubber bands, paper to create heart template, washable marker, and water bottle.

Step 1: Create a heart template. We used a file folder.
Step 2: Mist your shirt with water using a spray bottle.
Step 3: Fold the t-shirt in half. Place the folded heart along the fold of the t-shirt and use a washable marker to trace the heart on the shirt.
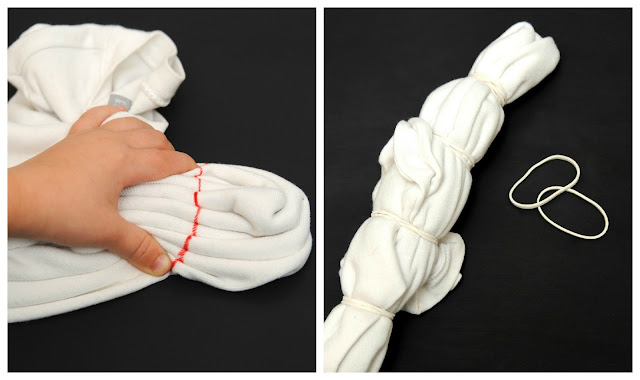
Step 4: Now for the most important part – to create the heart correctly, start at the top part of the heart and slowly pinch and gather along the entire heart (accordion style). Then place a rubber band around the outline of the heart. It is much easier than it sounds.
Step 5: Add rubber bands about every 3-4 inches along the rest of the shirt.
Step 6: Prepare the tie dye by following the directions on the box. I used black and red for Connor’s shirt and my friend used purple and red for her daughter’s shirt.
Step 7: Cover the heart end of the shirt with the red tie-dye and the rest of the shirt with your second color. You could even add a third color of tie-dye if you want to.
Step 8: Wrap tight in plastic wrap and let sit for 24 hours.
Step 9: Wash and dry.

This weekend we will be making tie dye shirts for ourselves because we love them so much!!
Have you ever tie dyed anything before? I need some more ideas for fun ways to tie dye.
Everything is fine, thank you.